MidiGurdy User Manual
For firmware version 1.1.5
This is the online user manual for the MidiGurdy - an electronic hurdy-gurdy. For more information about the instrument, please visit http://www.midigurdy.com.
Other formats
If you would like to read this documentation in another format, please see the links below:
Table of Contents
Introducing the MidiGurdy
The MidiGurdy is a fully electronic hurdy-gurdy that is designed to have a playing-feel as close to an acoustic hurdy-gurdy as possible.
Intended use
The main purpose of the MidiGurdy is to be tool for rehearsal, learning and teaching hurdy-gurdy playing techniques.
Hold and play it as you would do with an acoustic hurdy-gurdy. To hear the produced sounds, attach headphones or connect the instrument to an external amplifier or mixing desk. If you have an acoustic hurdy-gurdy, use the the mechanical features and software settings to change the playing feel and sound to match them to your acoustic instrument.
Attach the instrument to a computer to see a visual representation of your trompette technique. See where you place your coups and check the speed of your crank. Or use the visualisation to teach your trompette technique to others.
The MidiGurdy is also a new electronic musical instrument in it’s own right. You can use it as a MIDI-controller to control external synthesizers or use the built-in software synthesizer with non-hurdy-gurdy sounds.
Features
No maintenance
No acoustic sound production means (nearly) maintenance-free playing: no strings to tune, no cotton to replace, no rosin to be applied to the wheel. Simply pick up the instrument, switch it on and start playing right away.
Realistic control
The crank reacts with high precision to your right-hand technique. A physically adjustable brake allows you to change the required force to turn the wheel. A non-vibrating string inside the tangent box with adjustable tension and the movable sensor tangents on the keys allow you to change the playing feel of the keyboard. And the keys are pressure sensitive, offering many of the sound-shaping possibilities of acoustic instruments.
Extensible hurdy-gurdy sounds
The MidiGurdy comes pre-loaded with a selection of hurdy-gurdy sounds sampled from real instruments. And you can change them or add new sounds to your liking.
Nine strings – in any key or tuning
There are three melody, three drone and three trompette strings you can configure and control individually.
Practice anywhere - in silence
Playing with headphones means you can play even late at night without disturbing anyone. And the smaller form factor compared to most acoustic instruments make it more portable.
Two interfaces
Many of the MidiGurdy features can be controlled via the buttons and display on the instrument itself, but also more comfortably via a Web-Browser when you connect the MidiGurdy to your computer.
Open to all
The MidiGurdy software and sounds are all released under an Open-Source license and new versions will always be free of charge.
Important notes
Handling and maintenance
Warning
Always grab the instrument by the body or the rear tangent box support. Never carry or lift the instrument by the keyboard or individual keys!
Use a soft, dry cloth to clean the instrument, which may be slightly moistened if necessary.
Never use petrol, thinner, alcohol or similar cleaning agents to avoid damaging or discolouring the surface of the instrument.
All user-adjustable screws and controls should only ever be hand-tightened. Never tighten the screws or tuning knobs with great force.
Precautions for batteries
The required ambient temperature depends on the batteries used. Refer to the battery documentation. Never use or store the batteries in extremely hot places, e.g. in direct sunlight, in a closed vehicle or near a radiator. This could lead to leakage of battery fluid and shorten the battery life.
Keep the batteries dry and ensure that the connections are never exposed to moisture. This could lead to overheating or rusting on the battery and on the connections.
Make sure that batteries are never within the reach of small children.
Never hit the batteries or drop them. Strong shocks can lead to leakage of battery fluid, excessive heat generation, explosion or fire.
Further Precautions
Handle the controls and connectors of the instrument with due care. Excessive handling can lead to damage.
Never press or hit the display or place heavy objects on it.
When making or removing the connections, pull only on the plugs - never on the cables. This will prevent any damage to the cables and the instrument.
Warning
The instrument should only be serviced by an expert. Before opening the base plate, the instrument must be disconnected from all power sources (power supply, USB connection, battery).
Danger
Only use the original 5V power supply to power the instrument via the power connector. And only connect the 5V power supply to a suitable power outlet. Never plug it into an outlet of another voltage.
Notice regarding disposal (EU only)
When this “crossed-out wheeled bin” symbol is displayed on the product, owner’s manual, battery, or battery package, it signifies that when you wish to dispose of this product, manual, package or battery you must do so in an approved manner.
Do not discard this product, manual, package or battery along with ordinary household waste. Disposing in the correct manner will prevent harm to human health and potential damage to the environment.
Since the correct method of disposal will depend on the applicable laws and regulations in your locality, please contact your local administrative body for details. If the battery contains heavy metals in excess of the regulated amount, a chemical symbol is displayed below the “crossed-out wheeled bin” symbol on the battery or battery package.
Getting to know the MidiGurdy
In many ways the MidiGurdy works very similar to other hurdy-gurdies, but there are a few differences that you should be aware of. The MidiGurdy also offers many functions that you won‘t find on an acoustic instrument, which this manual will explain in detail.
In this section we will explore the mechanical features of the instrument and learn about the user controls and the connectors available on the MidiGurdy.
Mechanical Features
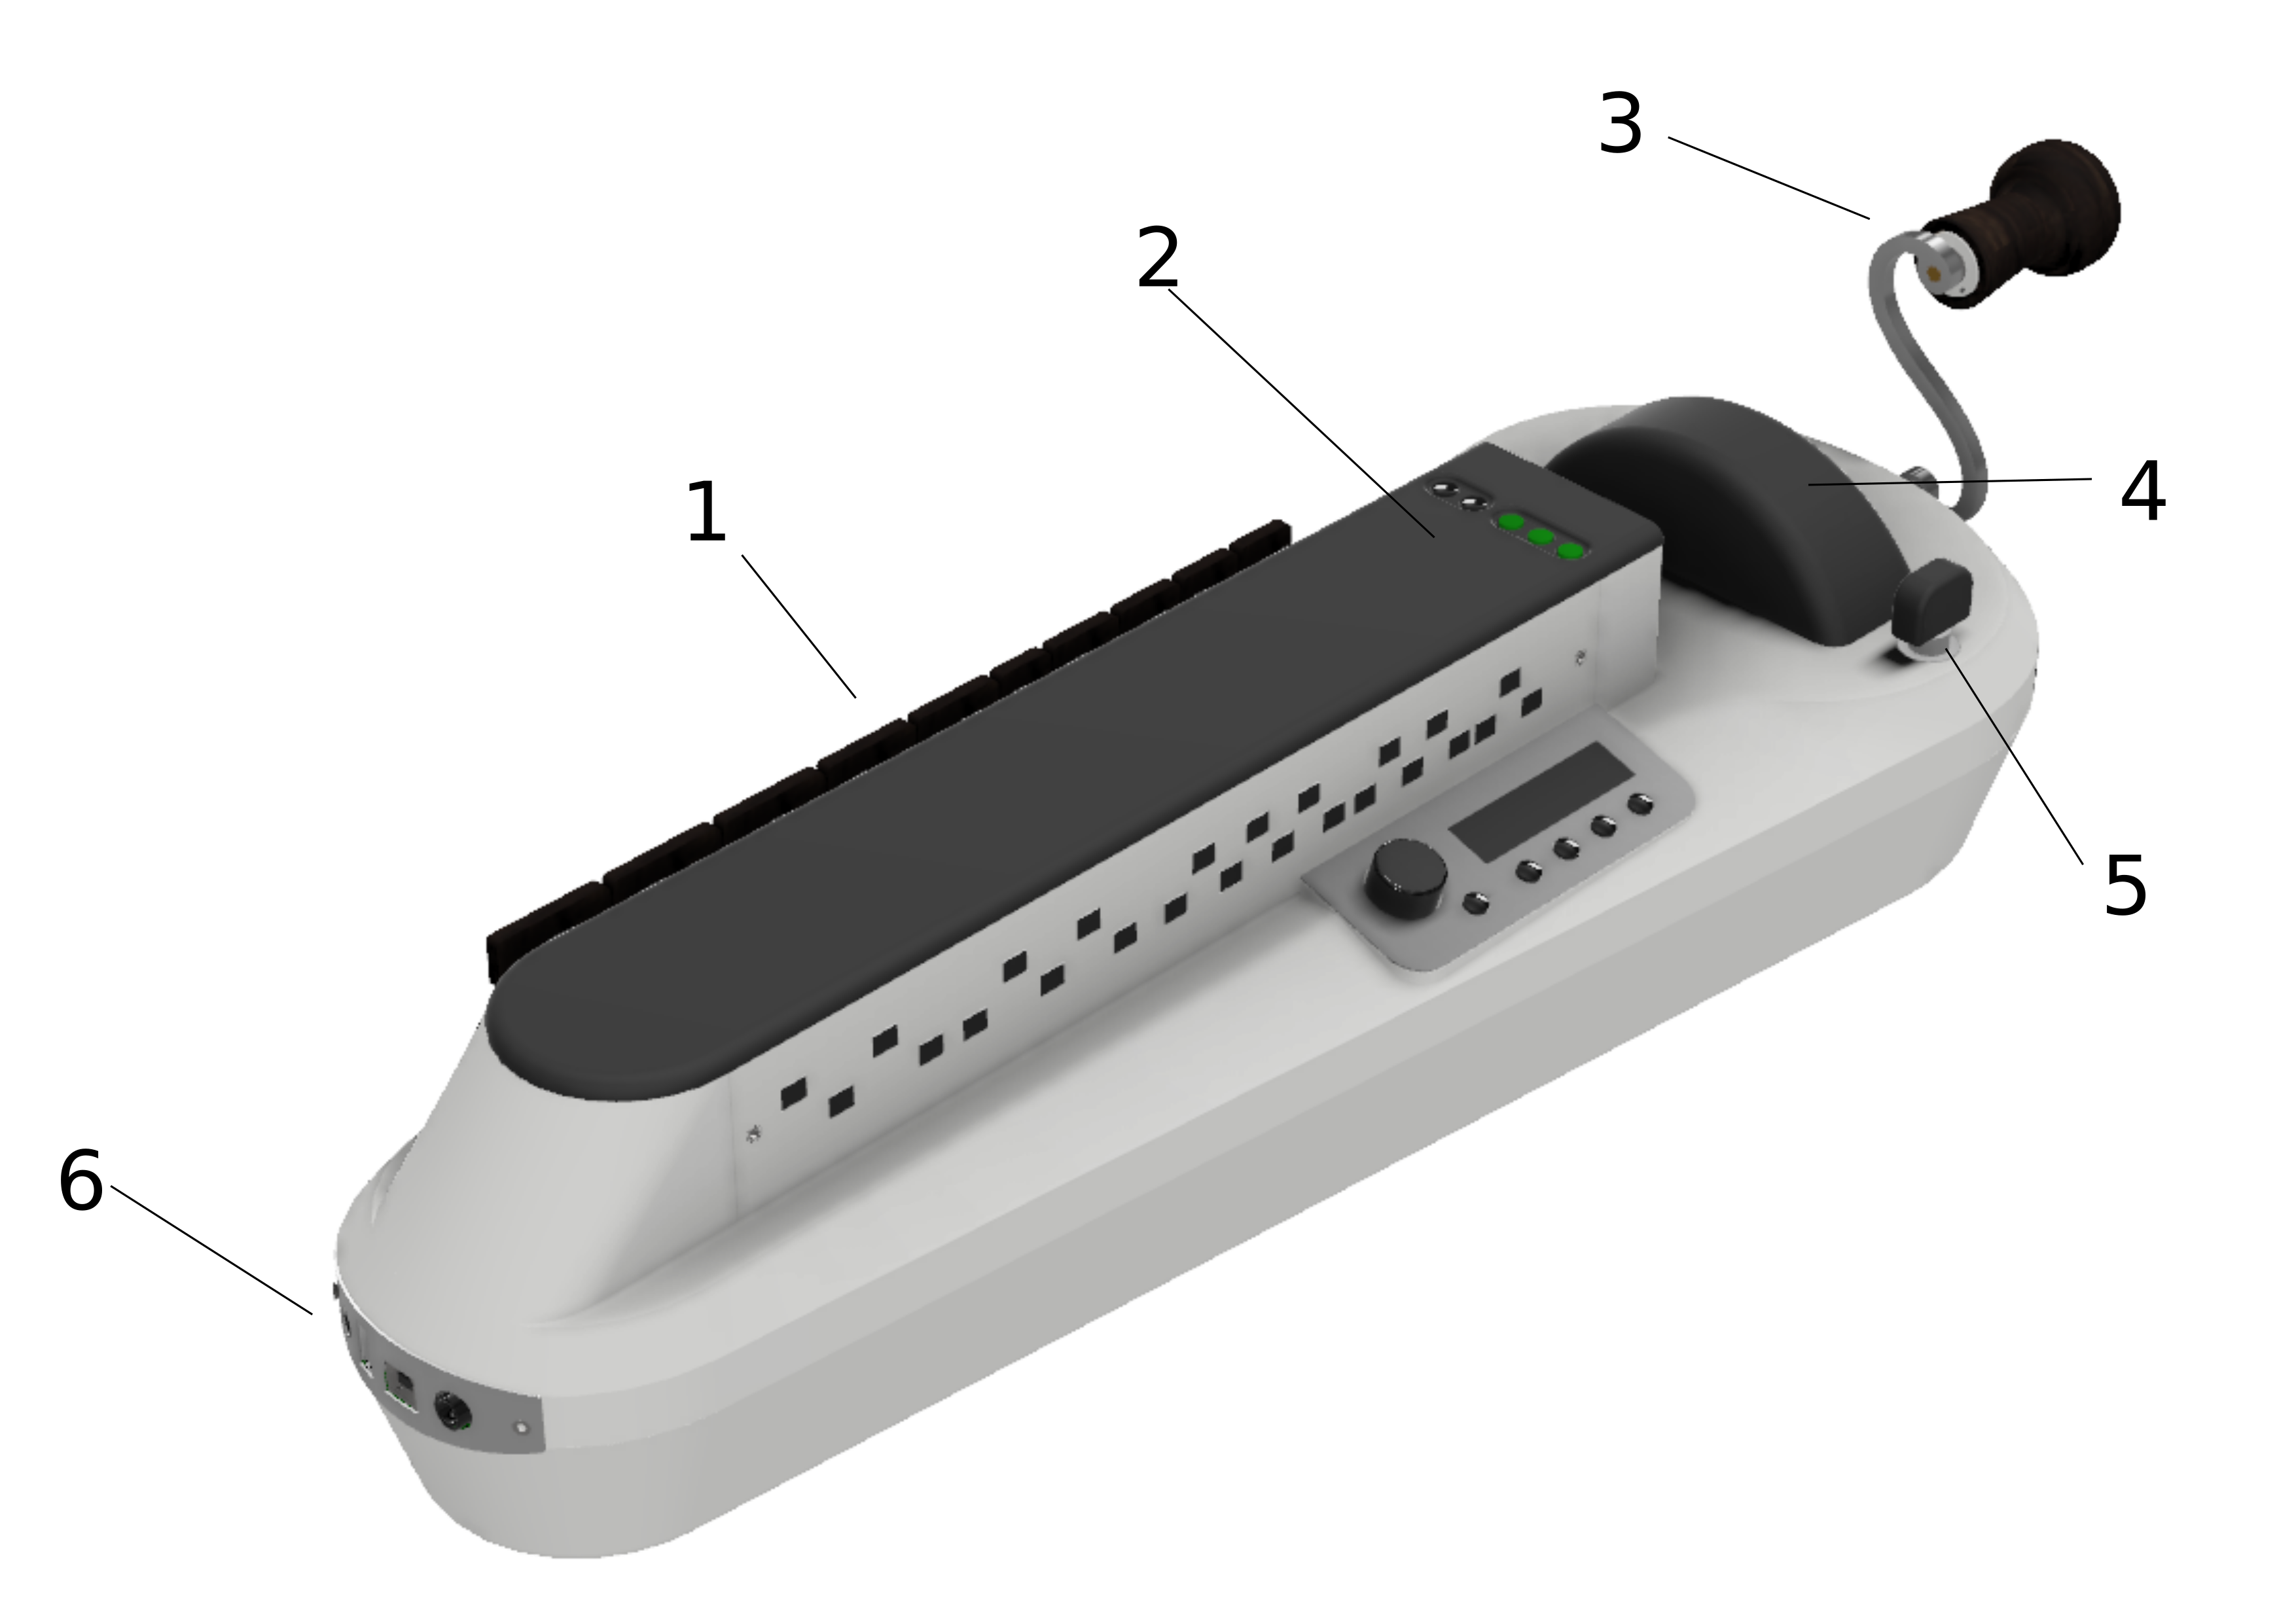
The mechanical features of the MidiGurdy
(1) Keyboard
The keyboard of the MidiGurdy works like most hurdy-gurdies and uses gravity for the keys to fall back into their original position. This requires you to tilt the instrument forward while playing.
(2) Tangent box lid
The tangent is covered by a wooden lid that is held in place using four magnets.
(3) Crank
The crank also works like you would expect from a hurdy-gurdy. You can turn it forwards, backwards, shake it and use it to sound the trompette by giving shorter or longer impulses while turning. The turning speed also affects the volume of the instrument.
(4) Wheel Cover
The wheel cover can be lifted by grabbing it on both sides and simply lifting it upwards with a little force. Once the cover is removed, you can grab the wheel to attach or remove the crank. To close the cover again, carefully insert it into the cut-out around the wheel and push down with a little force until you hear it snap into place.
(5) Wheel Brake Control
The black knob right next to the wheel cover controls the wheel brake. It is used to adjust the amount of resistance that you feel while turning the crank, simulating strings pressing down onto the wheel. Turn right to pull it tighter and increase the required force, turn left to loosen the brake and reduce the required force. Always turn the crank while adjusting the brake to avoid overloading the wheel and axle! Excessive force on the brake might damage the parts of the braking system.
(6) Front panel connectors
The front panel contains all connectors used to interface the MidiGurdy with external components. We will have a closer look at the individual input and output ports in the next section. Instrument strap pins There are three instrument strap pins: one at the front and two pins at the back.
Tangent box lid buttons
There are two distinct sections that are used to control the many different functions of the MidiGurdy: the five buttons in the tangent box lid and the main user interface.

Buttons in the tangent box lid
The lid of the tangent box contains five buttons, arranged in two groups. Let’s look at the group of three buttons closest to the player first, called the “String Buttons“.
The String Buttons (S1 S2 S3)
These buttons are used to switch individual strings on and off (lift them on and off the wheel). The order of the buttons follows the string positions on an acoustic hurdy-gurdy:
S1 drone string (closest to the keyboard)
S2 melody string (centre)
S3 trompette string (closest to the player)
Press any of these buttons, turn the crank and notice how the string sound gets switched on or off. An illuminated button means the string is currently switched on.
The Group Buttons (G2 G3)
The two black buttons on the tangent box lid are called the “Group“ buttons. The MidiGurdy has a total of nine strings but only three String Buttons for switching the strings on and off. This is why the Strings are arranged in three groups:
Group 1 – Drone 1, Melody 1, Trompette 1 (activated by default)
Group 2 – Drone 2, Melody 2, Trompette 2 ( activated with G2)
Group 3 – Drone 3, Melody 3, Trompette 3 (activated with G3)
If you only press the String Buttons S1, S2 or S3 you are controlling the strings in Group 1, as this group is active by default (i.e. if you don’t press any of the Group Buttons.)
If you want to control the strings in Group 2 instead, you simply hold the G2 button while pressing any of the String Buttons. Or hold the G3 button while pressing the String Buttons to control the strings in Group 3.
As soon as you press one of the Group Buttons, the illumination of the String Buttons changes to indicate the on/off state of the drone, melody and trompette string in that group.
Pressing the Group Buttons only affects which strings you switch on and off with the String Buttons. They have no other effect on the instrument. You can mix and match strings from all groups while playing, or even play all nine strings simultaneously.
User Interface
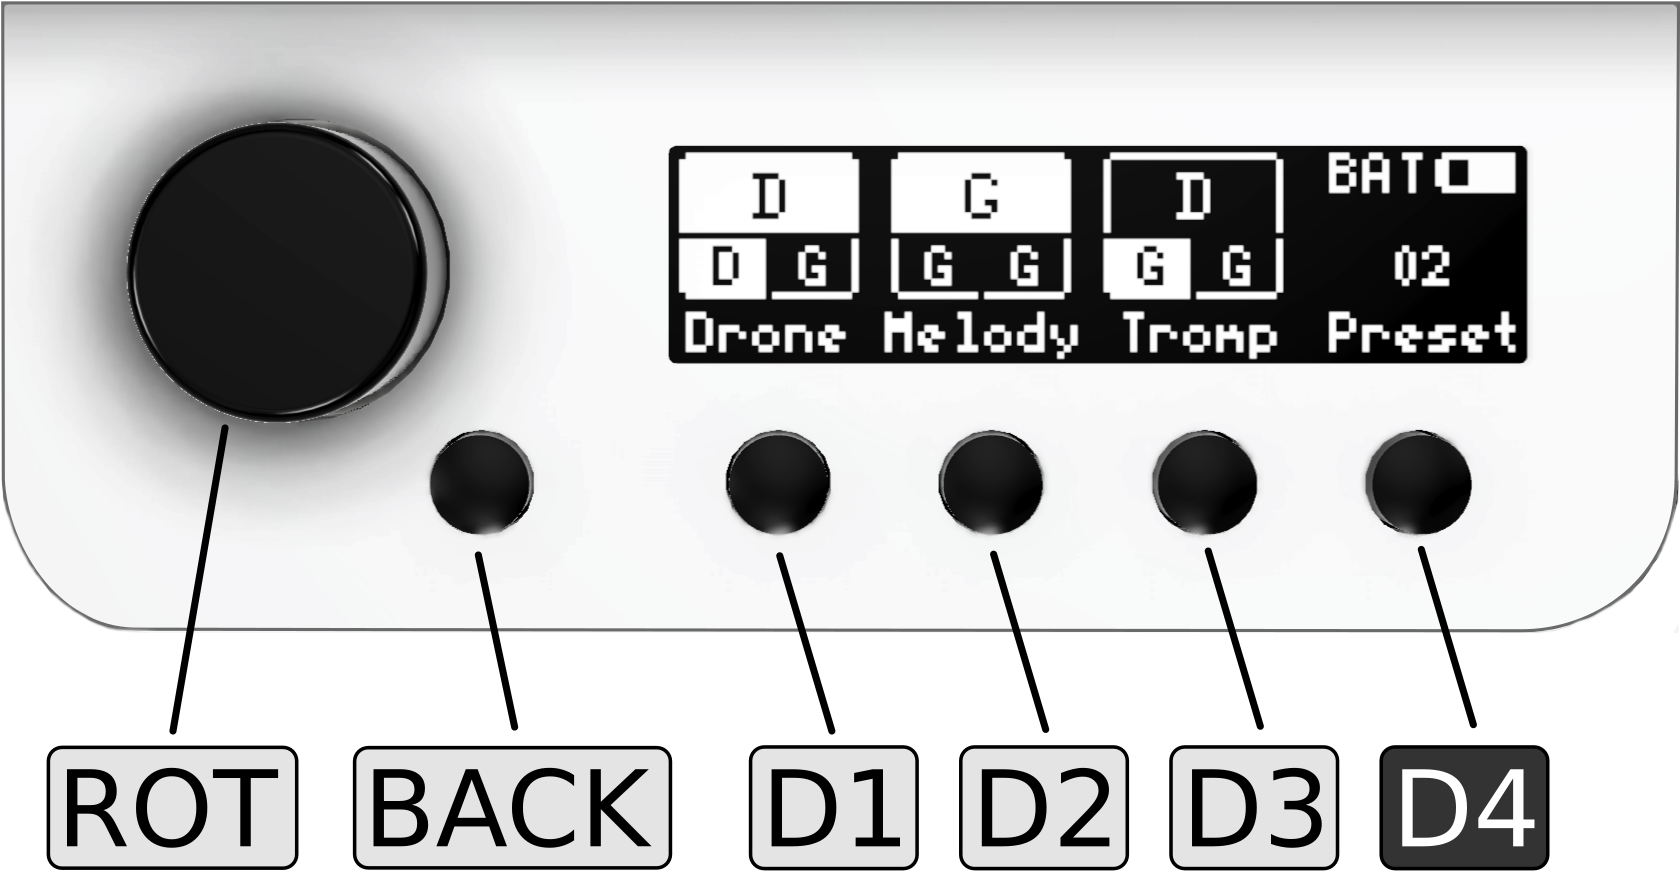
The main user interface of the MidiGurdy
The main user interface of the MidiGurdy consists of the display, a rotary knob and five buttons. First a short overview explaining the most important functions of the interface. For a detailed description of the settings and the menu system, please see the section The Menu System.
Display
The display of the MidiGurdy is used to show you the current setup of the instrument and is used to display all settings and menu items. By default it shows the so called “Home Screen“ which informs you about the current tuning and on/off state of all strings, the currently selected preset, how the instrument is powered and the estimated battery charge in case you are running on batteries (see The Menu System for more details).
Rotary knob (ROT)
You can turn this knob left and right and also press it like a button. Turning the knob is used to navigate the menu system or to increase or decrease values. Pressing the knob usually selects a menu item or confirms a changed value.
Back button (BACK)
The back button is right next to the rotary knob. Regardless on where you are in the menu system, pressing this button will always cancel the current selection or operation, bring you back to the previous screen and eventually back to the Home screen.
Display Buttons (D1 D2 D3 D4)
The four buttons under the display are called the “Display Buttons” and activate different functions depending on the currently active menu. By default, the first three buttons activate the configuration menus for
the drone strings D1
the melody strings D2
the trompette string D3
as indicated by their labels in the display on the Home Screen.
The rightmost button D4 is also called the “Power / Settings” button. As the name suggests, this button is used for multiple purposes:
Switching the MidiGurdy on and off:
Hold this button for about 1 second to switch the instrument on
Hold this button for about 4 seconds to switch the instrument off again
Hold this button for about 8 seconds and release it again to do a forced restart of the instrument. Use this if the MidiGurdy has locked up and doesn’t react to any user input any more (which hopefully will never happen!)
Opening the Presets and Settings menus with a short press of the button
Connections
The connectors at the front of the MidiGurdy connect the instrument with all external components and devices.
Power Supply
The MidiGurdy power connections
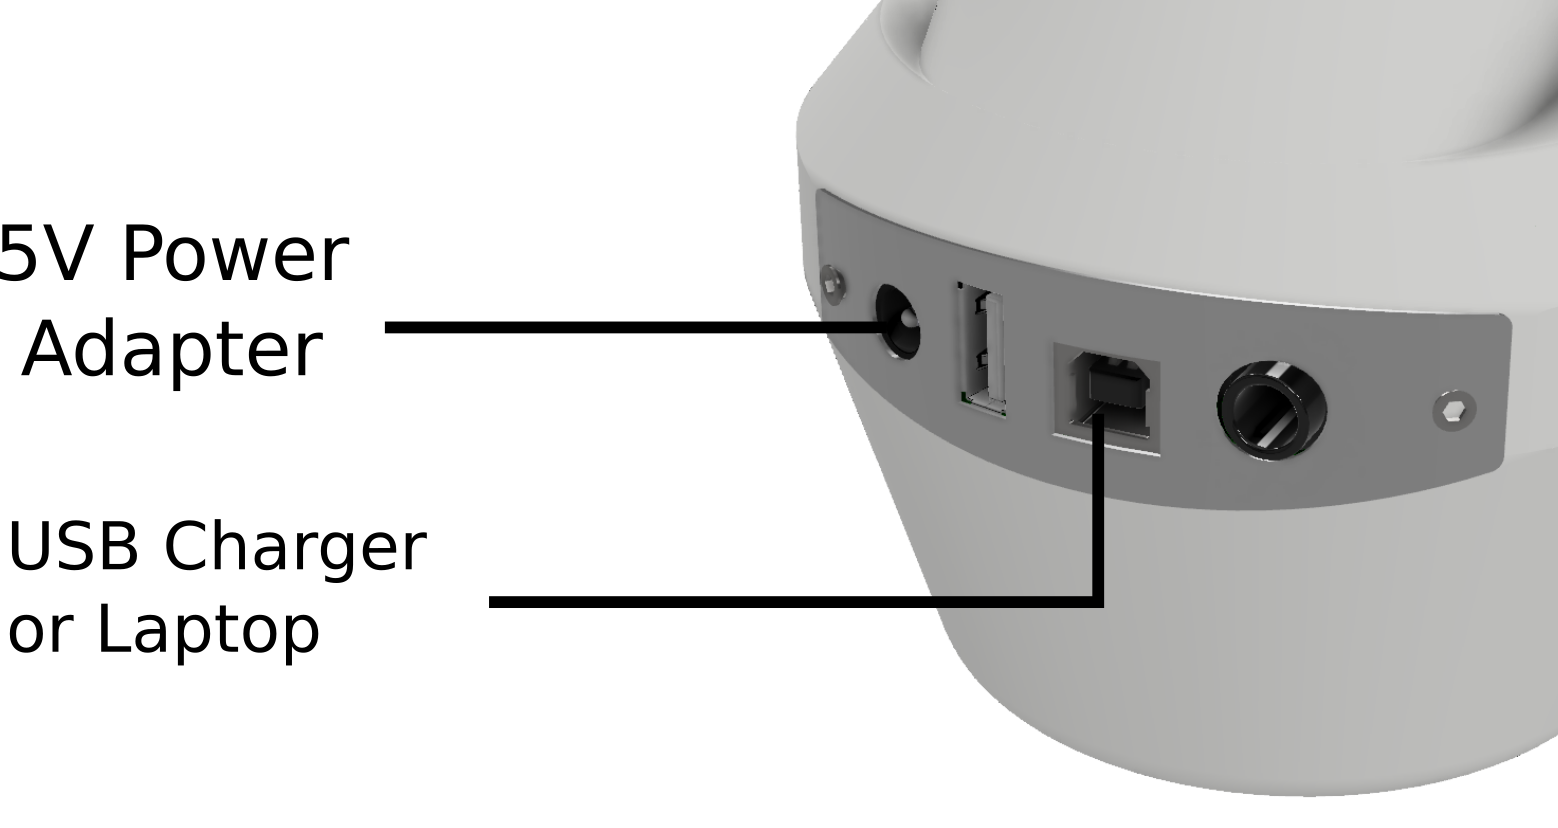
The MidiGurdy can be powered from three different sources:
By inserting eight AA / R6 / Mignon batteries or rechargeable batteries
By attaching the included 5V power supply
By attaching the USB-B port to another USB device like a computer, laptop or phone charger via a suitable USB cable
All three power sources can also be connected at the same time. The MidiGurdy will always choose the best source available and show the currently selected source in the top right corner of the display.
When the 5V power supply is connected, the instrument will always be powered via this source and will draw no power from the batteries or the USB port. When powered via USB and batteries, the instrument will mainly draw power from the USB connection and only fall back to the batteries if the USB connection cannot supply enough current.
Concerning Batteries
The MidiGurdy is designed to be used with eight AA batteries (also called R6 or Mignon cells). Either primary (disposable) or secondary (rechargeable) cells can be used. We recommend high-capacity 2500mAh NiMH rechargeable batteries, which will give you an estimated 10 – 12 hours of solid playing time.
The MidiGurdy does not contain a battery charger. If you use rechargeable batteries (which we highly recommend), you will need an external charger to bring them back to charge.
Warning
Always replace all batteries when inserting fresh batteries into the instrument, never replace only individual cells.
Please check the polarity of the batteries carefully before inserting them into the instrument!
Headphones
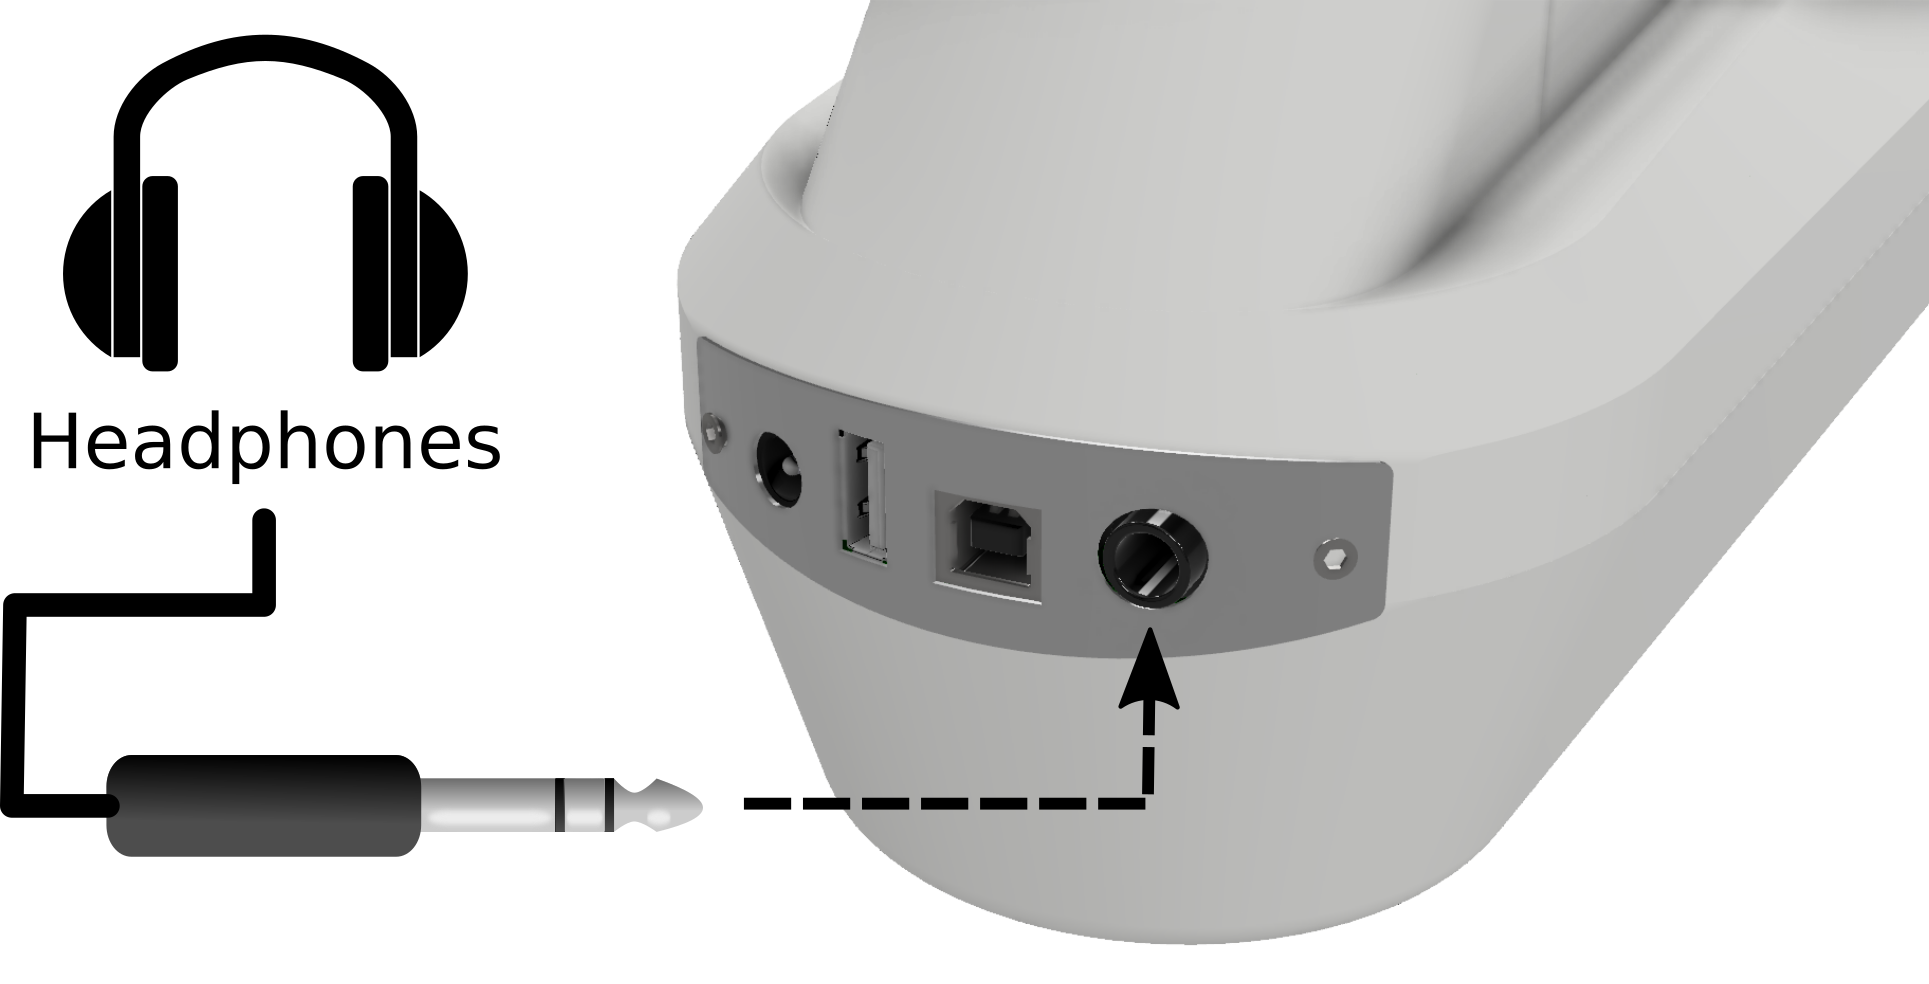
Connecting headphones to the MidiGurdy
The MidiGurdy outputs all sound via the 6,3mm (¼ inch) stereo jack connector. Simply insert the headphones and adjust the volume of the instrument to comfortable levels. See Volume Menus on how to change the volume.
Other Sound Equipment
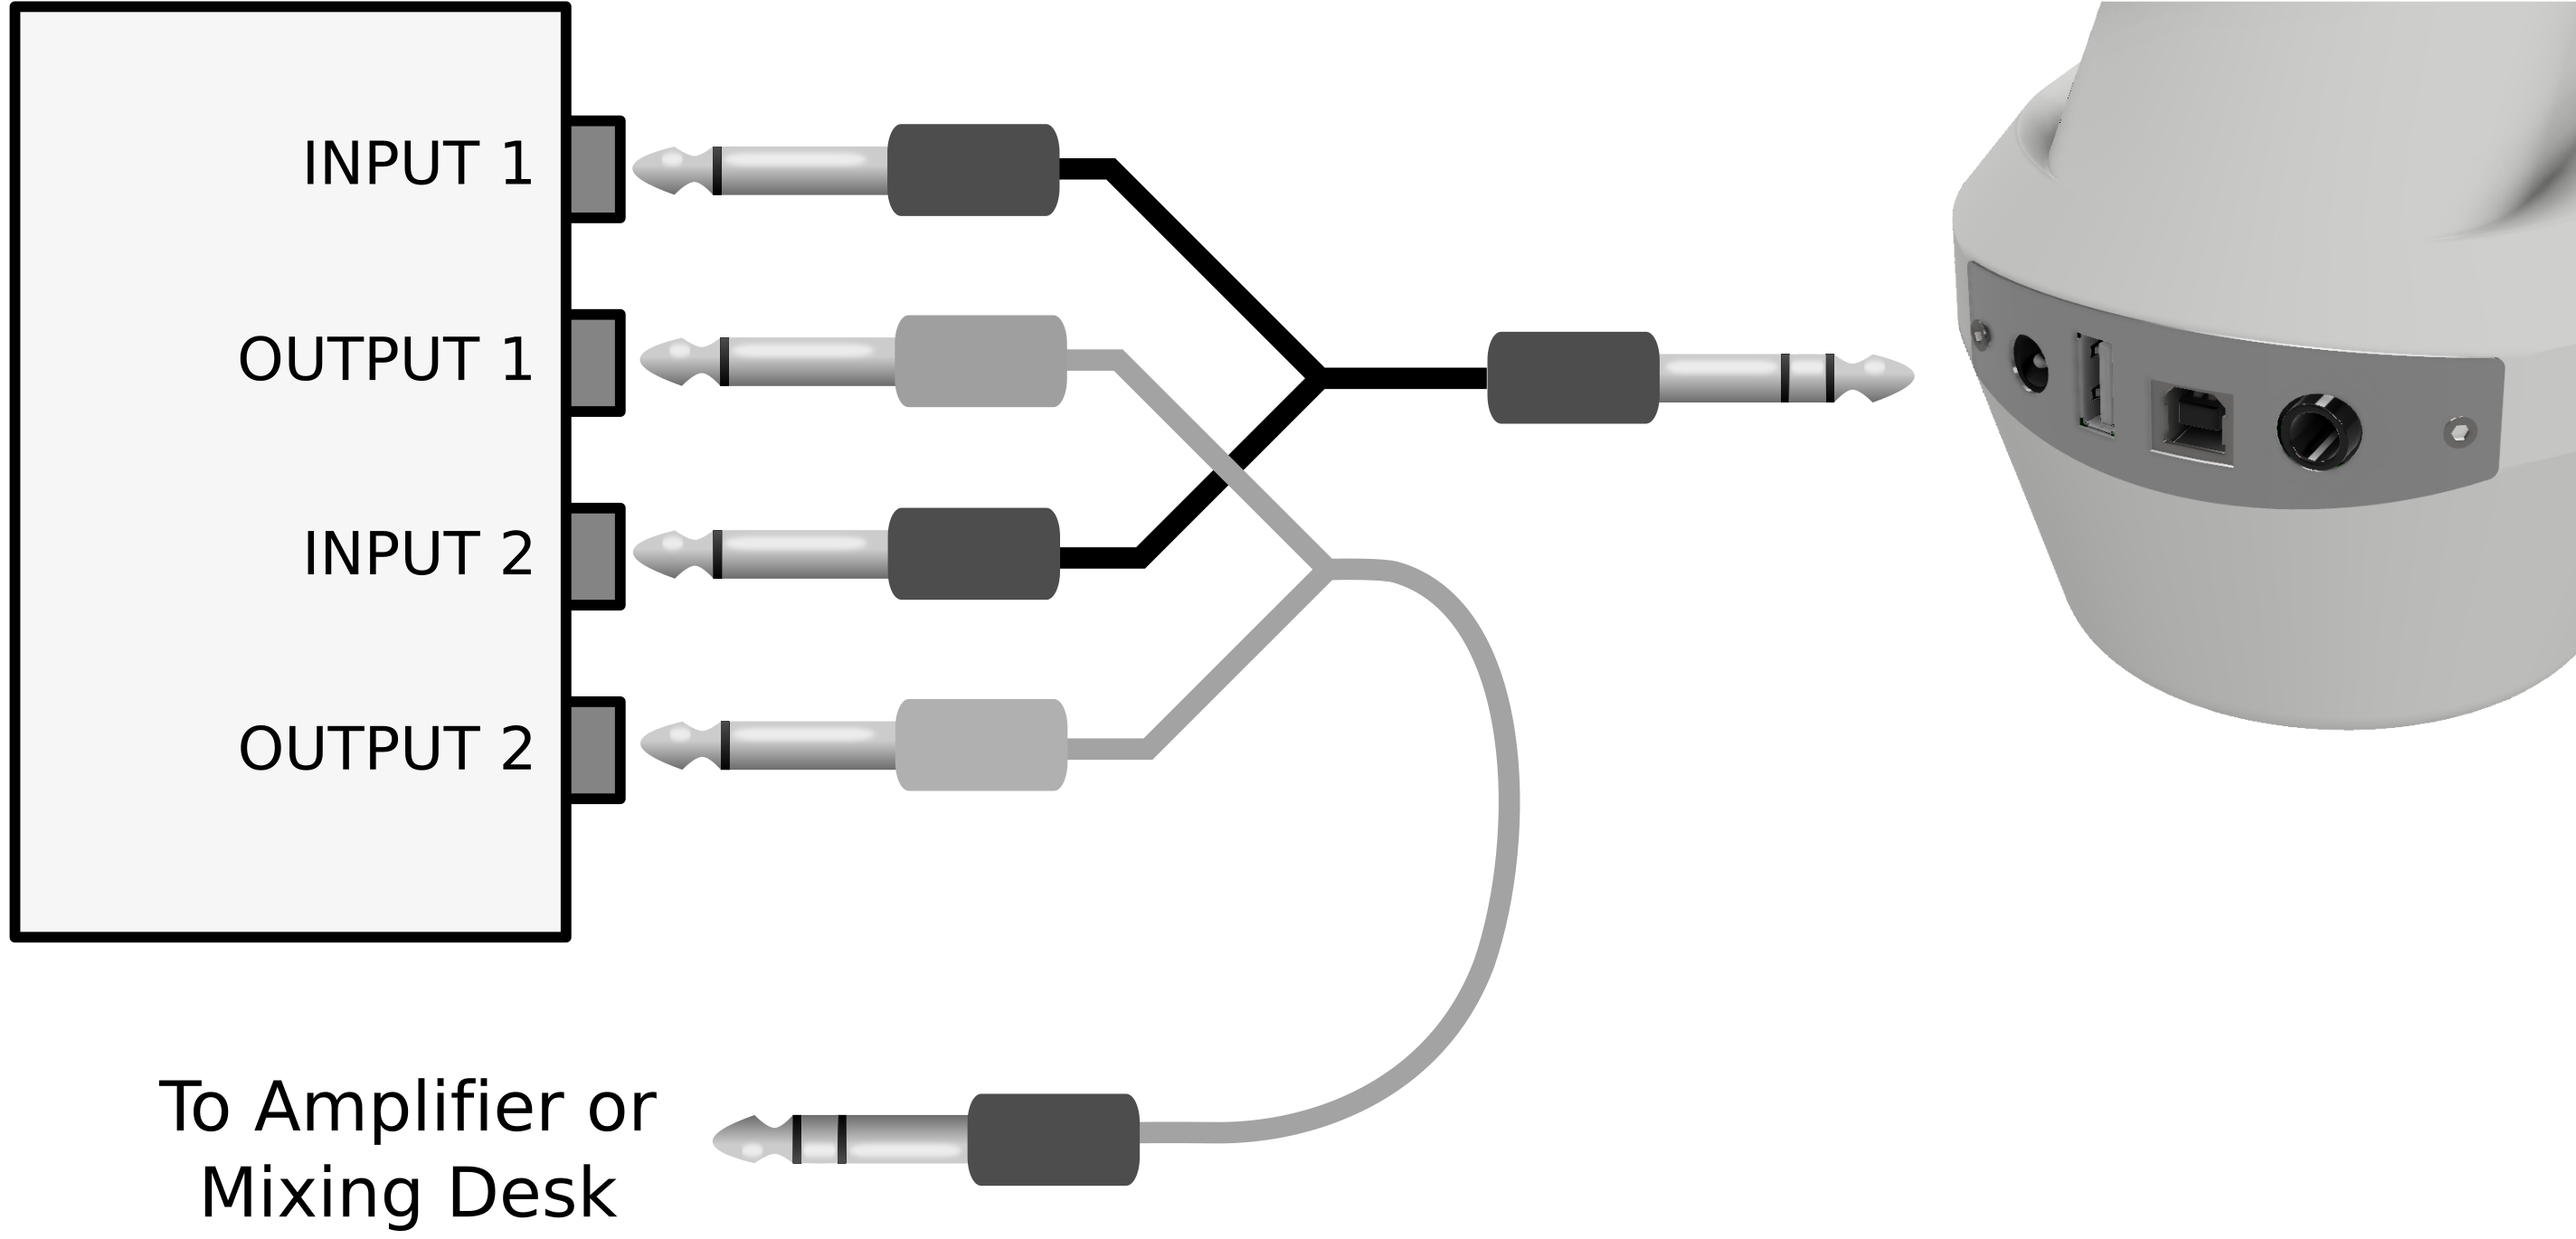
Connecting other sound equipment
To connect the MidiGurdy to an amplifier, a mixing console, recording device or other sound equipment, please use the supplied Y-cable and breakout box (“DI-box”). Connect the single stereo plug of the Y-cable to the headphone jack of the MidiGurdy and the two mono plugs to the ports on the breakout box marked “Input 1” and “Input 2”. Then connect one or both “Output” ports of the breakout box to the amplifier or other sound equipment.
Data Connection to Computer or Tablet via USB
To connect the MidiGurdy with a desktop computer, tablet or other device please use a USB-A to USB-B cable, as used for most USB printers.
Once connected, the MidiGurdy will act as two separate USB devices via this connection:
as a USB network card
as a USB-MIDI controller
Both function use a standard implementation and should therefore work on any modern computer or tablet without installing additional drivers.
Note
If your device provides enough power via the USB port, the MidiGurdy will use this connection to power itself, unless the 5V power supply (see above) is plugged in.
For more information on how to use the MidiGurdy via the USB connection, please refer to section The Web Interface.
External Synthesizer via USB-MIDI Connection
The MidiGurdy provides a standard USB-MIDI connection via the USB-B port and can therefore be used to control external synthesizers or other MIDI capable devices that have a USB-MIDI interface.
Simply attach the MidiGurdy with a suitable USB-A to USB-B cable as shown in the picture above.
The USB-MIDI connection setup can be configured via the web interface of the MidiGurdy. Please see the section The Web Interface for more details.
The Menu System
This section describes all menus and configuration items that are available on the MidiGurdy.
Please note that there are extended features and advanced settings that are only available via the Web Interface. Please see the The Web Interface on how to access and use it.
Home screen

The home screen of the instrument menu
The home screen shows the most important information about the current setup of the instrument. The MidiGurdy will always return to the home screen after a configurable period of inactivity (see Configuration Menu).
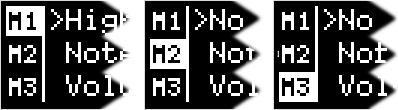
The largest part of the display is taken up by the visualisation of the current string state and tuning. From left to right you see the state for the drone, melody and trompette strings. Each area is divided into three sections: the top row shows the first string of each type, the bottom left the second and bottom right the third string. Enabled strings are shown with black text on white background, disabled strings are shown with white text on black background. Each section contains the currently chosen note for that particular string.
As an example, the picture above shows that there are currently four active strings: the first and second drone string, the first melody string and the second trompette string. Drone strings are tuned to D, D and G, the melody strings are all tuned to G and trompette strings are tuned to D, G, and G. P lease note that the display does not show the octave of the current tuning. To see which octave a string is tuned to, you would have to open the respective String Setup Menu (see below) by pressing the buttons under the string label.
In the top right corner of the home screen you can see the estimated charge of the batteries as a small battery icon, as well as the currently active power source:
BAT – powered via batteries
EXT – powered via 5V power supply
USB – powered via USB connection
The bottom right corner shows the number of the last loaded preset. See below for an explanation of the preset system.
Available controls on the home screen:
Turn the rotary knob ROT left or right to open the Chien Sensitivity menu
Press the rotary knob ROT to cycle through the volume menus for Main Volume, Reverb Volume and Key Volume.
Chien Sensitivity

Probably one of the most important settings you will want to change on the MidiGurdy is the sensitivity of the chien. On an acoustic hurdy-gurdy, you would tighten or loosen the tirant for that. On the MidiGurdy, you simply turn ROT left or right when you are on the Home Screen.
Turn right to make the chien more sensitive (to start buzzing at lower cranking speeds), turn left to make it less sensitive.
Please note that the chien sensitivity affects all three trompette strings at the same time. There is currently no way to have individual chien sensitivities for trompette strings, but this might be added in a future version of the software.
Volume Menus

When you press the rotary knob ROT on the home screen, you reach the Main Volume menu. Turn ROT left and right to decrease or increase the main volume of the instrument.

Press ROT again to reach the Reverb Volume menu, turn it left and right to decrease or increase the sympathetic string reverberation volume. d

Press ROT again to reach the Key Volume menu, turn it left or right to decrease or increase the volume of the simulated mechanical key noise.
The BACK button will bring you back to the Home Screen.
String Menus
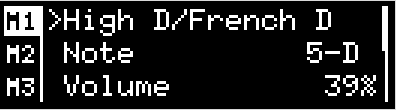
The String Menus are used to change the setup of all melody, drone and trompette strings of the MidiGurdy. You can access the String Menus by pressing one of the first three buttons D1 D2 D3 under the display, labelled “Drone”, “Melody” and “Tromp” (for Trompette).
These buttons always open up the String Menu, even when those labels are not shown above the buttons. Only if you see other labels above the buttons will their function be different.
When you press a String Menu button once, you open the String Menu for the first string of the chosen type, as indicated by the bar on the left of the screen. Press it again to choose the second string, and again to choose the third string.
For example, if you press D2 once, “M1” is selected in the left bar, indicating that you are editing the first melody string. Press it again to to edit the second melody string (“M2” is selected in the left bar) and again to select to edit the third melody string (“M3” selected in the left bar). The drone and trompette buttons work in exactly the same way.
Melody String Items
In addition to the items common to all string types, the Melody String Menu contains a few additional items that are only relevant for melody strings:
Capo – Some acoustic hurdy-gurdies allow the player to lock one of the lower keys in a pressed state, effectively acting as a capo for all melody strings. This setting allows you to simulate that setup on the MidiGurdy, separately for each melody string.
Polyphonic – Contrary to most acoustic hurdy-gurdies, you can choose to play the melody strings polyphonically. This means that when you press two or more keys at the same time, you will hear all notes simultaneously instead of just the note of the highest key.
Mode – This setting controls how the physical controls (keyboard and crank) affect the sound generation on this string:
“Hurdy-Gurdy”: this mode simulates a hurdy-gurdy. The string will only produce a sound if the crank is turned and the keyboard reacts similar to an acoustic hurdy-gurdy. This mode is the default for all “generic” Soundfonts (i.e. Soundfonts which were not specifically created for the MidiGurdy).
“MidiGurdy”: this mode is very similar to the “Hurdy-Gurdy” mode, but adds extended sound control via the keyboard. This mode is mostly useful for Soundfonts which have been specifically created for the MidiGurdy and is the default for those Soundfonts.
“Keyboard”: in this mode, the string can be played as if the MidiGurdy were a piano. Sound is only controlled via the keyboard and you don’t need to turn the crank to hear a sound. The keyboard is velocity-sensitive, which means that the volume of the sound is dependent on how fast you press the keys.
Preset Menu

Presets allow you to save and load the setup of the instrument very quickly. The MidiGurdy comes with a few pre-configured presets, but you can create your own presets or edit existing presets to your liking. To open the Preset Menu, press D4 and the list of presets will appear.
Loading a preset
To load a preset, select any numbered preset from the list with the rotary knob, then do a short press on the rotary knob.
Saving a preset
To save the current instrument setup to a new preset, go to the last entry in the preset list called “New preset…” and press the rotary knob.

A new screen will appear in which you can enter a name for the new preset. The first character of the name is highlighted and can be edited by turning ROT left or right to move though the available characters. Pressing the rotary knob after choosing a character moves to the next character position.
At the bottom of the screen you see new labels for the four buttons under the display:
DEL |
< |
> |
SAVE |
D1 |
D2 |
D3 |
D4 |
Press the buttons under the arrows < and > to change which character you are currently editing (moving the cursor).
Press the button under DEL to delete the currently selected character and shift all following characters to the left by one place.
Press the button under SAVE to accept the current name and save the preset.
You don’t have to enter a name to save a preset. In that case, the preset is called “Unnamed” in the list of presets and can only be identified by it’s number.
Editing a preset

To edit an existing preset, select the preset you want to move with the rotary knob and then do a long press on ROT to open the Edit Preset Menu. The chosen preset name will be displayed, along with four options: “Move”, “Rename”, “ Replace” and “Delete”. Select one of the options with the rotary knob or press BACK to cancel the operation.
Moving a preset
When you choose “Move” in the Preset Edit Menu, the preset list will appear with the chosen preset highlighted. Use the rotary knob to move it to the desired position, then do a short press on the rotary knob to save the new position. Or press the BACK button to cancel the operation.
Renaming a preset
When you choose “Rename” in the Preset Edit Menu, you will be presented with a screen where you can modify the preset name. This screen works just in the same way as if you would save a new preset (see “ Saving a preset” above).
Replacing a preset
When you choose “Replace” in the Preset Edit Menu, the current instrument setup will be stored over the preset you are currently editing, replacing everything with the new setup.
Deleting a preset
When you choose “Delete” in the Preset Edit Menu, the currently selected preset is deleted immediately and the following presets are shifted up automatically.
Configuration Menu
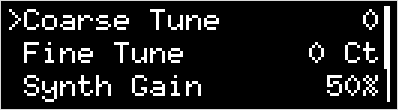
The configuration menu contains many settings that affect the instrument as a whole:
Coarse Tune – shifts the tuning of all strings of the MidiGurdy up or down the given number of semitones.
Fine Tune – shifts the tuning of all strings of the MidiGurdy up or down the given number of cents. The default tuning (Fine Tune = 0, Coarse Tune = 0) of the instrument with the supplied Soundfonts is A=440Hz.
Pitch Bend – controls the amount of pitch bend in cent that you will hear when pressing a key harder or softer. Increase this value for more pitch bend, decrease it for less. 100 cent equal one semitone.
Synth Gain – Controls the amount of gain (amplification) used in the internal synthesizer. Depending on the sounds you have chosen for the strings and the volume of the samples in the Soundfont, you might have to increase the gain to reach the desired volume or decrease the gain to avoid digital distortion and clipping in the synthesizer.
Keynoise… - opens a menu similar to the String Menu where you can choose the sound of the key noise channel and change the volume and stereo balance of the key noise.
Brightness – Controls the brightness of the display.
Disp. Timeout – Controls the number of seconds of inactivity after which the menu system will return to the Home Screen automatically.
The Web Interface
When you connect the MidiGurdy to a desktop computer, laptop or tablet via the USB connection, you will be able to access the Web Interface to configure the instrument, upload new sounds and to use the visualisation of your trompette technique.
In the following description we always call the computing device you are using to access the MidiGurdy “computer”.
Making the connection
As explained in Data Connection to Computer or Tablet via USB, please use a USB-A to USB-B cable to connect the MidiGurdy to your computer.
Once the connection has been established, the MidiGurdy will present itself as a USB network card to your computer. It acts as a a class-compliant USB device, which means that you should not have to install special drivers to use it.
The connection has been tested to work on Windows 7, Windows 8, Windows 10, OS X, Linux and iOS.
Android Support
Sadly, the network connection is currently only supported on rooted Android devices. If you don’t know what a rooted Android device is, then you probably don’t have one.
The MidiGurdy and your computer will automatically set up a private network, so only your computer and the MidiGurdy can talk to each other. At no point will the MidiGurdy be accessible to the Internet or someone on the Internet be able to reach the MidiGurdy. Even computers on your local Wi-Fi network will not be able to access the MidiGurdy.
By default, the IP address of the MidiGurdy is 10.10.10.10. So once the connection has been established, open the Web Browser of your choice and type the following into the address bar:
Alternatively, if your computer supports ZeroConf (Linux, Android) or Bonjour (OS X, Windows), you should be able to access the MidiGurdy via the following URL:
Windows does not support ZeroConf or Bonjour by default, but you can can install the “Bonjour Print Services for Windows” from the Apple Website to enable support for Bonjour.
If you see a web page saying “Welcome to the MidiGurdy!” in your browser, the connection has been established successfully and you are all ready to go.
Features of the Web Interface
The Web Interface gives you access to all settings that are also available via the Menu System on the instrument itself. In addition, there are some functions that are only available via the Web-Interface, namely:
Adding and removing sounds
Visualisation of the trompette technique
Advanced configuration to change the response to keyboard and crank
Keyboard calibration
Note
The features of the web-interface have not been documented properly yet. Please watch this space for updated documentation.
Software Upgrades
From time to time it might be necessary to upgrade the Software running on the MidiGurdy to a new version. Either to fix existing problems or to take advantage of new features.
MidiGurdy Software Download
The newest versions of the MidiGurdy software can always be found in the download section of the MidiGurdy website: http://www.midigurdy.com/downloads/
Software Version and Compatibility
The versioning of the software follows a simple scheme: <Major Version>.<Minor Version>.<Patch level>. For example, the Version number “1.11.5” is major version 1, minor version 11 and patch level 5.
The patch level is increased for small changes or bugfixes that don’t change the behaviour of the instrument in a noticeable way (apart from fixing the bug, of course).
The minor version is increased for new features or changed behaviour that are noticeable for the user, but still work with your existing configuration and presets.
A new major version indicates that there are changes that are incompatible with the previous version and therefore require you to backup your configuration before the upgrade and restore ( or recreate) it again afterwards.
Always read the release notes!
When upgrading to a new version, please read the release notes carefully before upgrading!
Upgrading via USB stick
In order to upgrade the MidiGurdy software, you will need a USB stick with sufficient space for the upgrade file. Download the new software release from the MidiGurdy website to your computer and store it on the USB stick. Make sure you store it with the exact filename, i.e. the version 1.2.3 will be called “midigurdy-1.2.3.swu”
Eject the USB stick from your computer and attach it to the MidiGurdy via the USB-A host port. After a few seconds the MidiGurdy will inform you that it has found an upgrade file on the USB stick and ask if you want to go ahead with the upgrade. Follow the instructions on the display to complete the upgrade process.
Important: Do not interrupt the upgrade!
Do not switch off the MidiGurdy while the upgrade is in progress and ensure that the instrument is supplied with sufficient power before starting the upgrade!
During the upgrade, the String Buttons in the tangent box lid will flash to indicate that the upgrade is in progress. Once the upgrade has finished, remove the USB stick from the MidiGurdy and press any button to restart the instrument. After a successful upgrade, the version number shown during start-up should match the version you wanted to upgrade to.
Troubleshooting
If the MidiGurdy does not start the upgrade process a few seconds after you have inserted the USB stick, please double-check if the upgrade file has actually been written to the USB stick and that the file is called “midigurdy-X.Y.Z.swu”, where X, Y and Z indicate the version you are upgrading to.
If your USB stick does not work
There are some USB sticks that draw a lot of power from the USB port in order to function properly (especially sticks with very high capacity or USB 3.0 transfer speeds). If your stick is not recognized, please try a different USB stick with a lower power consumption.
In case the upgrade process was interrupted by a power failure or has failed due to a different reason, the previous software version will still be intact and working. Simply restarting the MidiGurdy should bring it back into a working state.
In case the instrument does not start again after all, please contact us for support. As the MidiGurdy uses a replaceable SD-Card for data storage, you will always be able to revive your instrument if an upgrade went horribly wrong.
Additional Notes
You can always upgrade or downgrade to any version of the MidiGurdy software. But please take special care when upgrading or downgrading between different major versions!
Adjusting the Keyboard
The MidiGurdy allows you to adjust some of the mechanical aspects of the keyboard in order to match them to your liking or to recreate some of the playing feel of your acoustic hurdy-gurdy.
There are two properties you can change:
the tension of the string inside the tangent box
the travel of the keys before hitting the string.
Opening and closing the tangent box lid
Open up the tangent box lid by grabbing the protruding end on the side towards the wheel cover. Push or pull it upwards with a little force to separate it from the magnets holding it in place. The lid is connected to the body via a small cable, so please make sure you don’t pull the lid away too far without unplugging the cable.
Once you’ve made your adjustments, replace the lid and the magnets should make it snap into place.
Changing the string tension
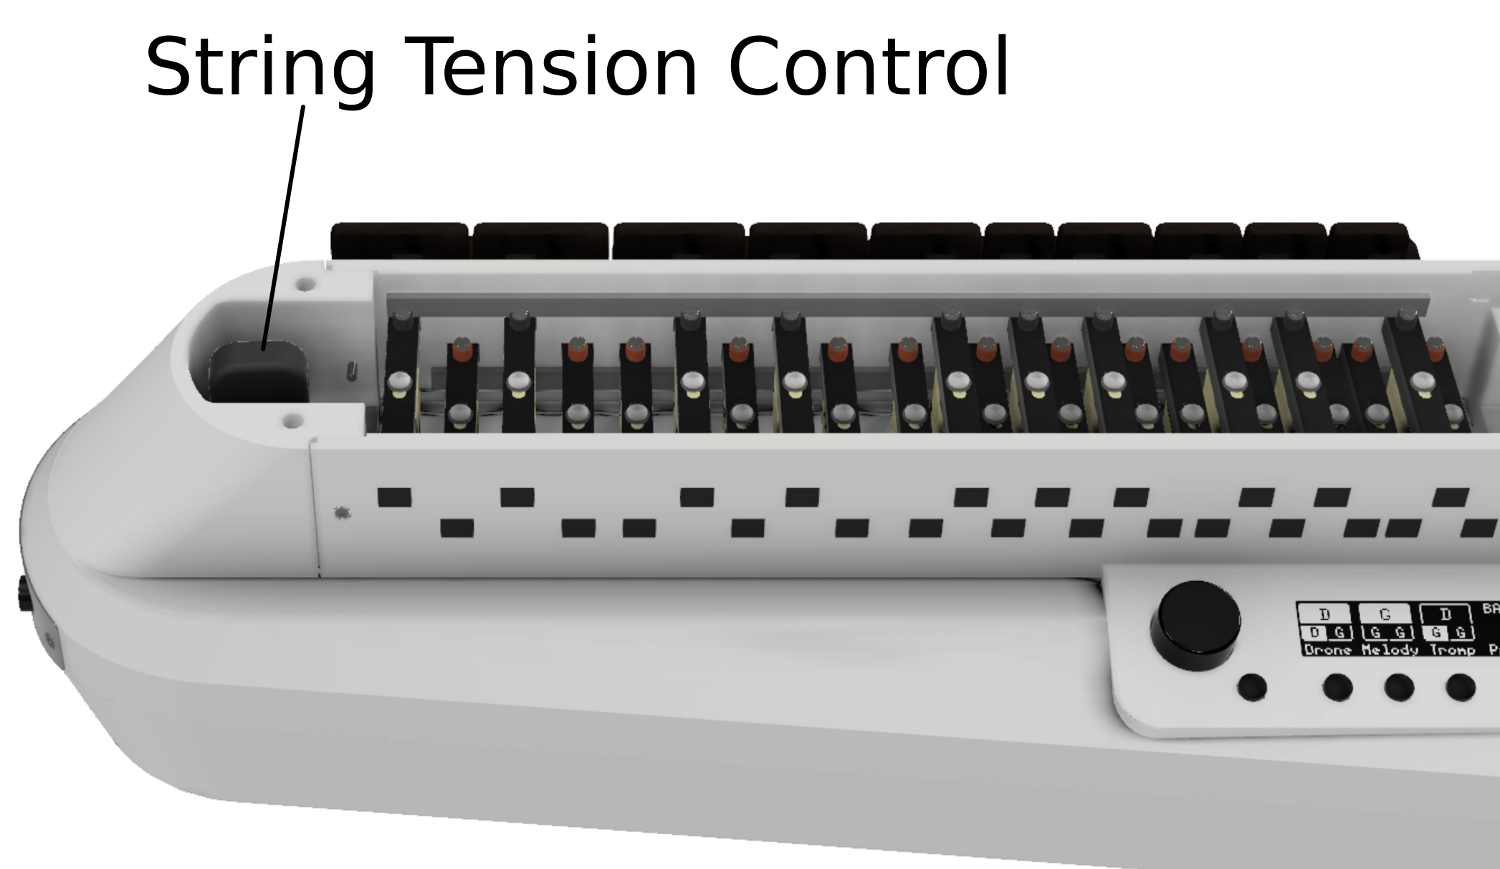
Location of the string tension tuner
Inside the tangent box you see the instrument tuner near the front of the instrument. Turn the knob on the tuner clockwise to increase the string tension or anti-clockwise to decrease the tension.
Always make small adjustments
Always make only small adjustments to the string tension and check if the playing feel has changed to your liking. Increasing the tension too much might damage the instrument!
Changing the key travel
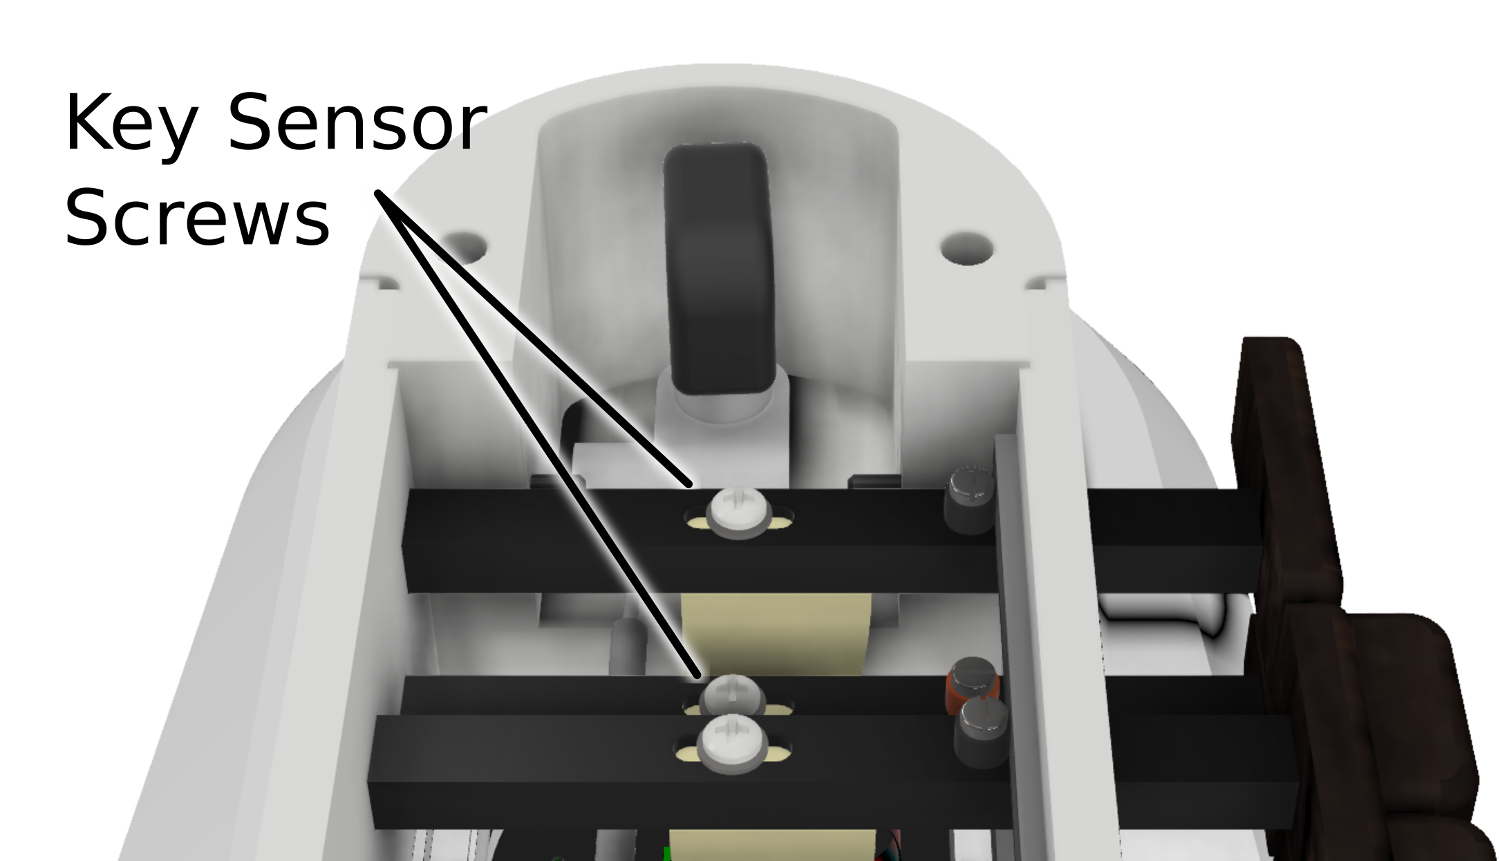
Location of the key sensor screws
The key travel can be adjusted for each individual key by changing the position of the key sensor.
Use a small Phillips screwdriver to loosen the screw holding the sensor in place a little bit.
Use the screwdriver to shift the screw and attached key sensor forwards or backwards. You might need to use a little force to move it the first time. Pressing down on the screw or lifting it with a fingernail might help to get it to move more freely.
Once you have positioned the key sensor, tighten the screw again, but only very lightly.
Only loosen the screws
Only unscrew the key sensor a small amount until you can move it. Do not unscrew it all the way, otherwise the key sensor might drop away from the key, making it very difficult to get it back into place!
Do not tighten with a lot of force
Only tighten the screws of the key sensor with a small amount of force! Ideally you should use a screwdriver with a thin handle to turn the screw, reducing the force you can apply to the screw. The key sensor will hold in place even when the screw is not very tightly secured!
Recalibration
The key sensors are very sensitive to the amount of force with which they are pressed against the string. This means that larger changes to the string tension or a significant change in key travel might make it necessary to recalibrate the keyboard sensors.
To recalibrate the keyboard, please connect the MidiGurdy to a computer to access the Web-Interface. Then choose the recalibration function from the Advanced menu.
Troubleshooting
If the instrument does not work as expected, please try to identify the problem by following the instructions below. If your problem is not listed or cannot be solved with the given hints, please use the support forum at https://forum.midigurdy.com or contact us directly.
The instrument turns off for no apparent reason or sometimes doesn’t start at all
If you have a device plugged into the USB host port (maybe a USB stick or a USB-to-MIDI converter), remove the device and see if the problem persists.
If you are powering the MidiGurdy only via the USB port:
Use a shorter USB cable and / or use a different USB port on the connected device.
If using a phone charger as power supply via USB, use a different phone charger that can deliver more power.
Insert charged batteries into the instrument. The batteries can compensate for the current peaks if the connected device cannot supply enough current.
Connect the supplied power supply
If you are powering the MidiGurdy via the 5V power supply:
Check the polarity of the batteries
Use a different power source, like USB or batteries. Maybe the power supply is faulty.
If you are powering the MidiGurdy only via batteries:
Replace the batteries with new or freshly charged ones
The instrument does not produce any sound when turning the crank
Ensure that you have connected working headphones to the MidiGurdy headphone connector
Make sure you have loaded a sound for at least one of the strings.
Check the main volume and the string volume
My stereo headphones sound like they output two identical mono signals
Turn the balance of a sounding string to the far left or far right to check the stereo balance.
Ensure that you are using a TRS-style connector (a headphone plug with only three sections on the plug). TRRS-style connectors (with four sections, as found on many headsets and headphones with microphones or volume controls) might not work as expected.
If you are using a 3.5mm to 6.3mm adapter for your headphones, ensure that it is a stereo adapter and that it works as expected by testing it on another device.
I hear a lot of noise or humming when connecting the instrument to an external speaker or other sound device
Make sure you are using the supplied Y-cable and the breakout box to properly separate the MidiGurdy from the external device. See Other Sound Equipment on how to connect the MidiGurdy to external sound devices.
Check if the casing of the plug inserted into the headphone socket is made of metal and touches the front cover shielding the connectors. A connection between plug and front cover might lead to ground loops and a lot of noise in the output.
Technical Details
Dimensions
Weight |
2.7 kg (without batteries) |
Physical dimensions |
53 cm x 20 cm x 12,5 cm (Length x Width x Height, maximum values) |
Crank thread |
M6 |
Processor
CPU |
Dual-Core Coretex-A7 ARM CPU |
RAM |
1 GB |
Operating System |
Linux |
Electrical Details
Typical power consumption |
1 watt |
Supply voltage |
5V DC with supplied power supply |
Battery supply |
8x AA/R6/Mignon batteries |
Audio Output |
Stereo headphone amplifier |
Connectors
5V power supply plug |
2.1 x 5.5 x 9.5mm (center positive) |
Headphone jack |
6.3mm stereo (TRS – Tip, Ring, Sleeve) |
USB host |
USB-A |
USB device |
USB-B |